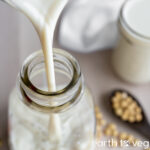
Homemade Soy Milk (Stovetop or Instant Pot)
Servings: 8 cups (240 g each)
Calories: 100kcal
Cost: $0.12 per cup
A comprehensive guide to making your own homemade soy milk from dried beans, including conversions from US to metric and ratios for scaling up or down.
Print Recipe
Equipment
- Blender
- Instant Pot (optional)
- Nut milk bag (*can use cheesecloth as an alternative)
Ingredients
For Soaking
- 1 cup dried soybeans
- 3 cups cold water
For Blending
- 2 qt water, divided into 6 cups + 2 cups
Instructions
- Soak the soybeans in 3 cups of cold water overnight (12–16 hours). If you plan to soak any longer, please leave in the fridge, or the beans will start to develop a sour smell.
- After soaking, pick out any debris and misshapen beans, then rinse and drain. No need to de-hull the beans.
- Blend on high speed for a minute or until very smooth. (If your blender has a smoothie mode, use that.)
- Strain the soybean mixture using a nut milk bag (see Note 2 if you don't have one of these) into a large cooking pot or Instant Pot. Rinse out the blender with 2 more cups of water and pour that through the strainer.
- Save the okara for some other use, then cook the soy milk using one of the two options below.
Stovetop Option
- Set the pot containing soy milk on medium heat. Stir frequently and keep a careful watch over the pot because soy milk foams over very quickly when heated, just like real milk! Be ready to take it off the heat at any moment.
- The milk foam will gradually increase while cooking, but just keep stirring to keep it down. At some point, the foam will keep rising and rising despite continuous stirring. This is when you should quickly take it off the heat. The foam will slowly subside... and once it's cool enough to touch you can enjoy it right away or pour it into containers for storage (it will keep up to five days, refrigerated).
Instant Pot Option
- Set the Instant Pot on the Pressure Cook function ("Manual" on older models) on High Pressure for 5 minutes. Allow pressure to naturally release before opening. You can drink the soy milk right away (after cooling it down, ofc) or store for up to five days in the fridge.
Notes
- If your blender is too small to blend all the soybeans and water at once, you can reduce the water amount until it's at a safe level for the blender. Just add the remaining water during step 5 when you're rinsing out the blender. The important thing to remember is that you are adding 8 cups total to your drained soybeans; how much you add in step 4 vs step 5 doesn't really matter as much, although more water in step 4 makes it easier for the blender to blend the soy milk smoothly.
- Don't have a nut milk bag? You can also use a piece of cheesecloth, folded two or three times, or a muslin sheet. However, a nut milk bag is a great investment if you plan on making your own plant milks a lot; it's durable, strains very finely and produces a milk with minimal grittiness, and the bag shape really makes straining easier.
- Because this is all natural soy milk without any added stabilizers, you may find a thicker liquid settling on the bottom of the container when it's been sitting in the fridge for a while. (This only tends to happen when I use a coarser straining mesh; soy milk made with strainers of 200 microns or smaller didn't have this issue). If this happens to you, just shake well before drinking.
Nutrition
Calories: 100kcal | Carbohydrates: 7g | Protein: 8g | Fat: 4g | Saturated Fat: 1g | Polyunsaturated Fat: 3g | Monounsaturated Fat: 1g | Sodium: 0.5mg | Potassium: 404mg | Fiber: 2g | Sugar: 2g | Vitamin A: 5IU | Vitamin C: 1mg | Calcium: 62mg | Iron: 4mg