Paska is a Ukrainian Easter sweet bread that is enjoyed throughout Eastern Europe. With my Vegan Paska Recipe, you don’t have to miss out on this delicious holiday tradition. Bursting with zesty orange flavour thanks to the use of fresh oranges (peels and all!) this rich, sweet paska has the bonus of being a zero-waste recipe too. Pair it with Avgolemono Soup and Cauliflower Cheese for a multicultural Easter Feast.
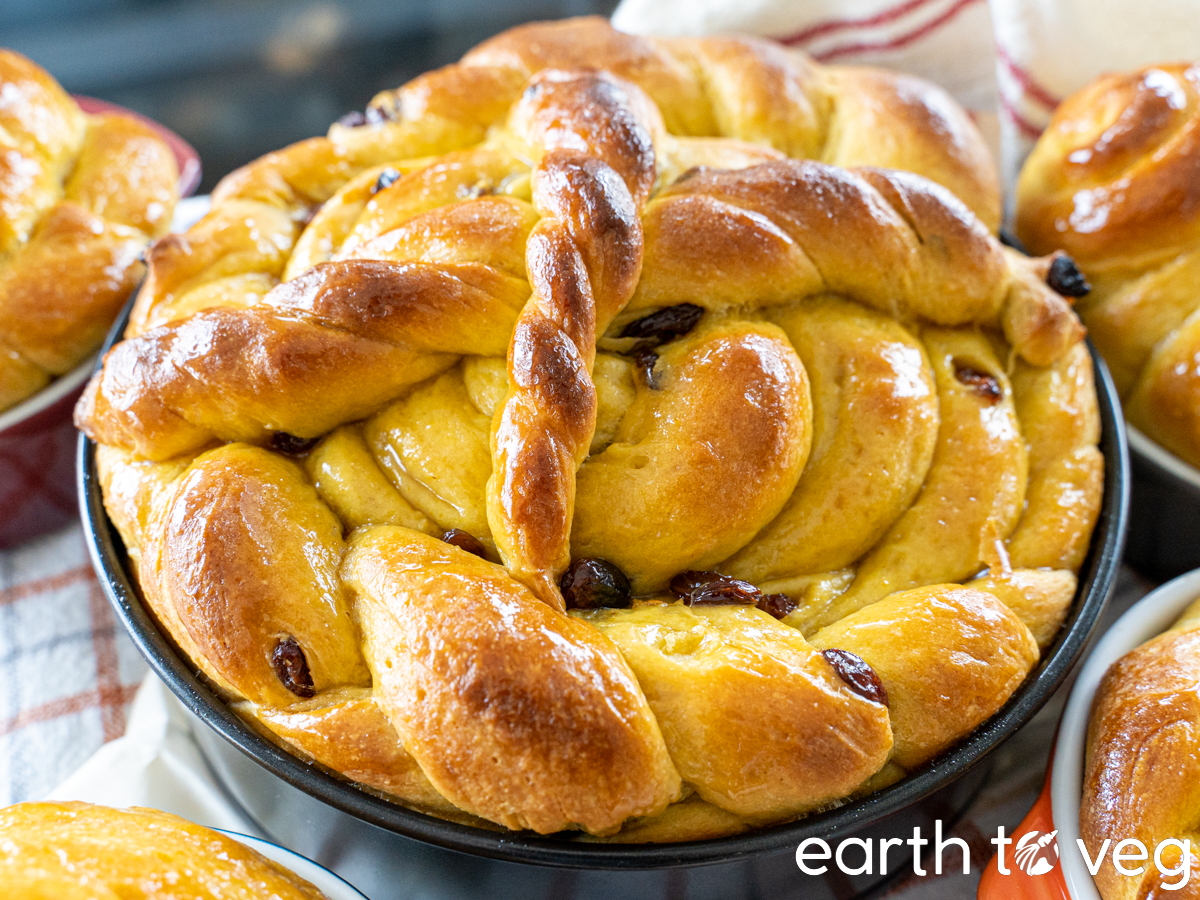
Why You’ll Love This Recipe
- Celebrate Easter: Paska is a traditional Easter bread in many Eastern European communities, such as Ukraine, Russia, Georgia, and Belarus, as well as Mennonite communities throughout the world. Whether eating paska is part of your heritage or you want to pay homage to the cultures that do, it’s a hands-on and tasty way to ring in Easter.
- Zero-waste: This paska recipe uses whole oranges—including the peels!
- Dairy-free and vegan: Traditional paska contains animal products such as eggs and butter. This vegan paska is an animal-friendly alternative. It’s a great option for anyone who’s lactose intolerant, has egg allergies, or is vegan/vegetarian. Why not make your Easter feast a little more inclusive this year?
- Tested to perfection: I adapted this recipe from a non-vegan one that I used to make. After testing this recipe several times with different types of milk, flours, and egg substitutes, I finally have a vegan paska that lives up to the standard of the original.
Ingredients Needed
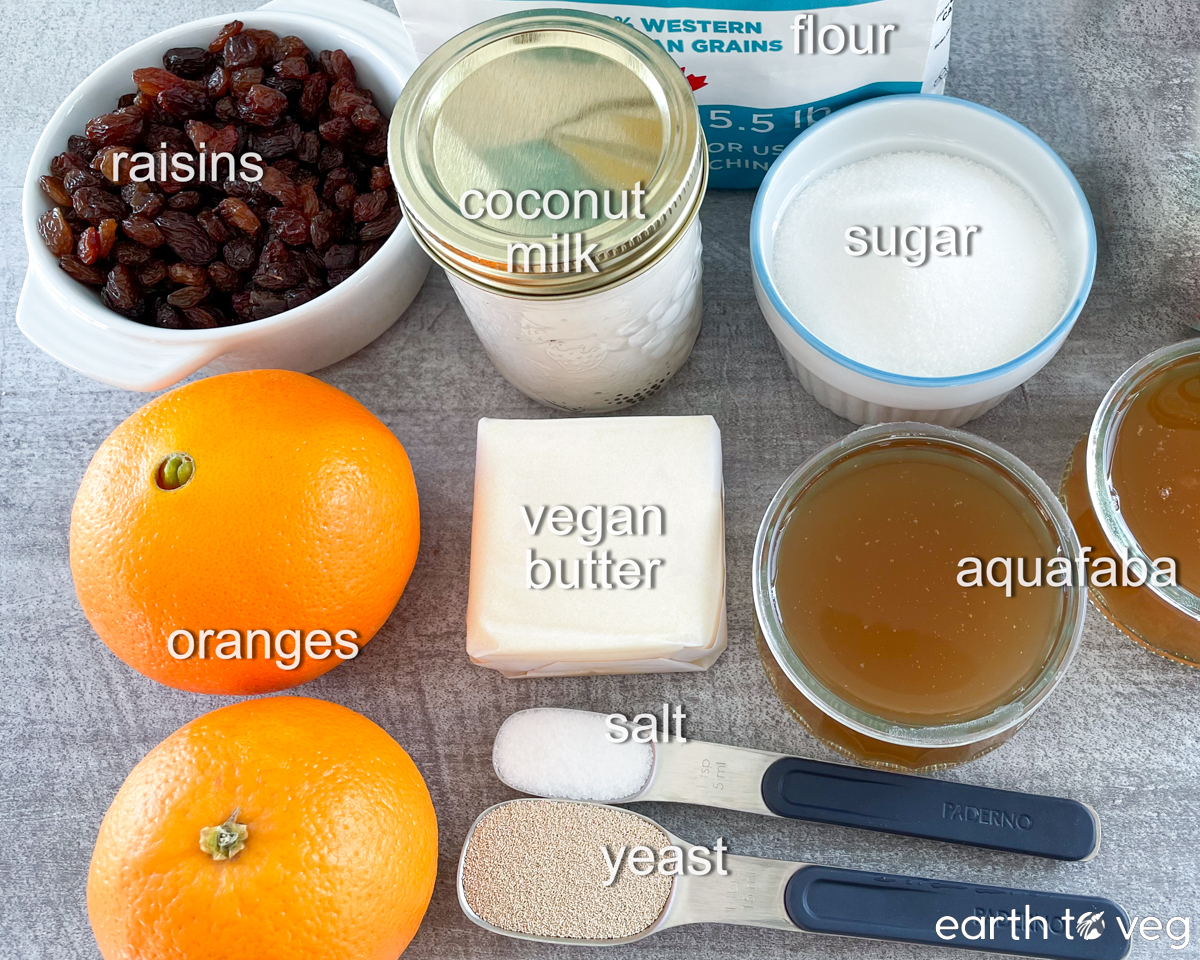
A few important notes on some of the ingredients used in this paska recipe:
Oranges: Ukrainian paska has a zesty orange flavour because we use real oranges, juice and peels and all. As with every baking recipe on this site, I strongly recommend weighing your ingredients. With something so variable in size like oranges, I can’t possibly guarantee your oranges are the same as mine. Using an orange that’s too big can make your dough frustratingly sticky, while using oranges that are too small will make it stiff and dry. For best results, I recommend you get a scale and weigh out exactly 350g of fresh oranges.
Aquafaba or soyfaba: Aquafaba is the golden gelatinous liquid found in a can of chickpeas. It’s rich in protein and replaces the role of eggs in vegan baking. If you’re concerned about using it because of BPA or other chemicals in canned beans, you can also make it yourself from dried chickpeas. Simply boil chickpeas until soft, then store them overnight in the cooking water. Strain out the chickpeas and you’re left with aquafaba! Soyfaba is similar but made with soybeans instead of chickpeas. I have tried this recipe with both and they both work great.
Coconut milk is the only type of plant-based milk that gives the amount of richness I require from a good paska. Full-fat coconut milk is recommended. If you use lite coconut milk or substitute a different milk, your dough might be a bit stickier and harder to work with, and the end result won’t be as buttery rich.
Butter: Any vegan butter or margarine works here. I’ve been using Parkay Margarine Squares since that’s the cheapest option around here lately. (Note: the Parkay tubs don’t seem to be vegan, but the squares are. And I prefer the squares anyway since they are measured out to be 113g each, exactly what you need for this recipe.)
Sugar: Do not skimp out on the sugar, a good paska is supposed to be lightly sweet! Regular granulated white sugar is fine. I haven’t tried making this recipe with alternative sweeteners yet.
Instant yeast: Please use instant yeast and not active dry yeast. Also note that some instant yeasts are “fast-acting” or “rapid-rise,” which are specifically formulated to work faster than regular yeast. Keep in mind also that the age of your yeast will impact its efficacy. So the bread rising times given in this recipe are only a guideline, you should always use your judgment or the finger poke test to determine when the dough is ready.
Bread flour or all purpose flour: Either type of flour will work just great, although bread flour will give you a bit of a higher rise. Note that the exact amount of flour you’ll need depends on many factors. The goal is to get a dough that’s very soft, tacky, and smooth, but not overly sticky. Even if you weigh out your ingredients precisely, you may find your dough is a bit stickier than expected due to factors like time of year (summer is typically more humid than winter), different water absorption, etc… So if your dough is too sticky, then sprinkle on a bit more flour to make it more manageable. But try to add as little extra flour as possible. The higher the hydration of this bread, the better it tastes.
Raisins are an optional add-in for this recipe. Other popular options are chocolate chips, candied peels, or chopped nuts.
Finally, in lieu of an egg wash, you can brush runny apricot jam or melted butter onto the paskas to give them a glossy sheen. But keep in mind that this shine is only temporary, since overtime it will absorb into the bread. So brush it on right before serving for the best-looking presentation!
For a full list of ingredients and quantities, refer to the recipe card at the bottom of this post.
Substitutions & Flavour Variations
Here are a few ways you can modify this recipe:
- Add chocolate chips or chopped nuts instead of raisins.
- Substitute one of the oranges with a lemon.
- Instead of brushing each paska with jam or butter, drizzle them with sweet glaze or icing, or spread a thick frosting over each bread, and decorate with sprinkles. (This variation is popular in Mennonite communities.)
- In Canada, there is even a tradition of making a cheese-and-egg-yolk based spread to spread on paska.
If you made this recipe with a successful substitution, please let me know! Post a comment describing what you did so I can add it to this section and help future readers. (Leave your name blank if you don’t want to be credited.)
Equipment
You will need a stand mixer with a dough hook for this recipe. Since this is an enriched dough with lots of plant-based milk and butter, it will take a lot of kneading to get adequate gluten development and believe me, you don’t want to spend an hour on Easter morning hand-kneading the dough!
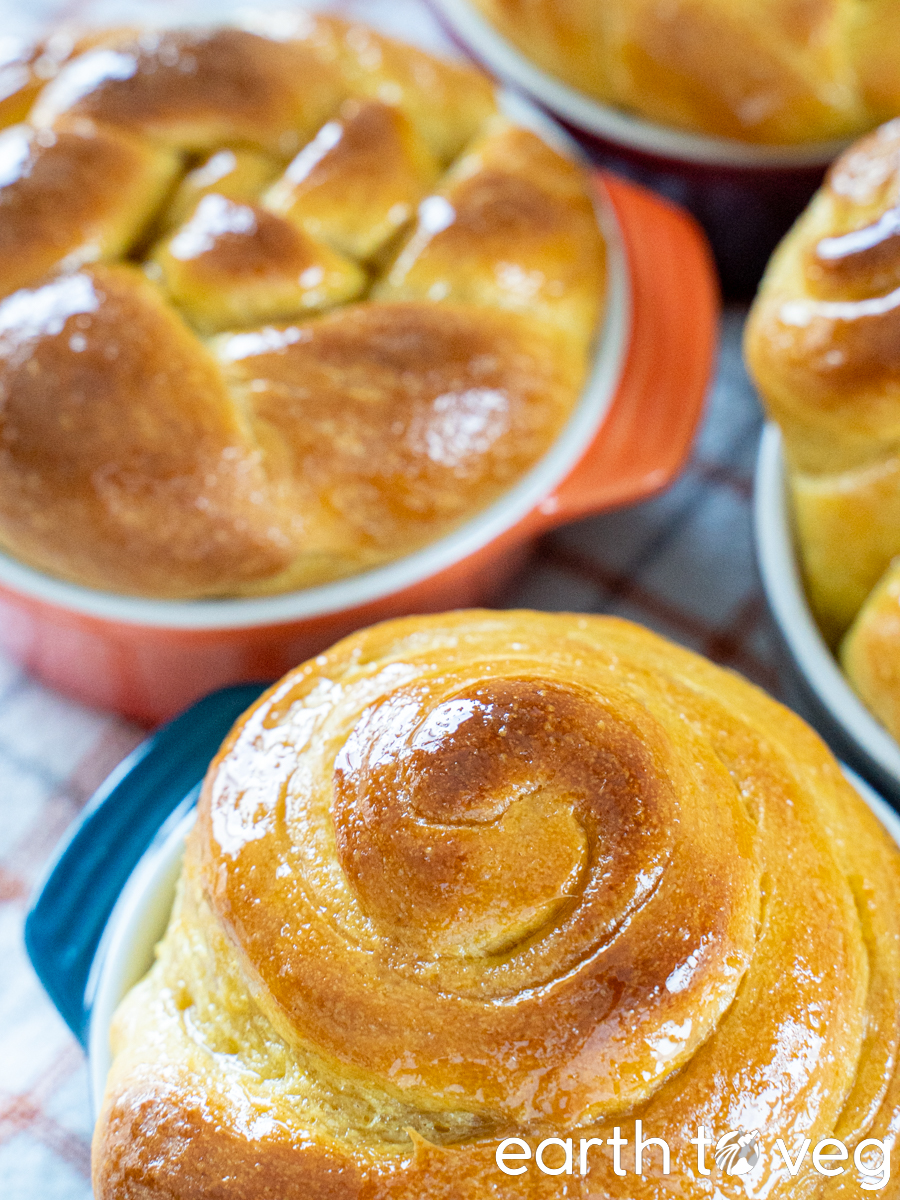
Traditionally, paska is baked in paper molds (like the kind used for panettone). However, you can also use a cake tin or even a loaf pan. To bake smaller personal-sized paskas, use ramekins or mini casserole dishes.
Step-by-Step Process
Making vegan paska consists of three steps: making the dough and first rise (1½ hours), shaping the dough and second rise (1 hour), and baking (25 to 45 minutes). Refer to the images below, or check out the video demonstration.
Mix Dough
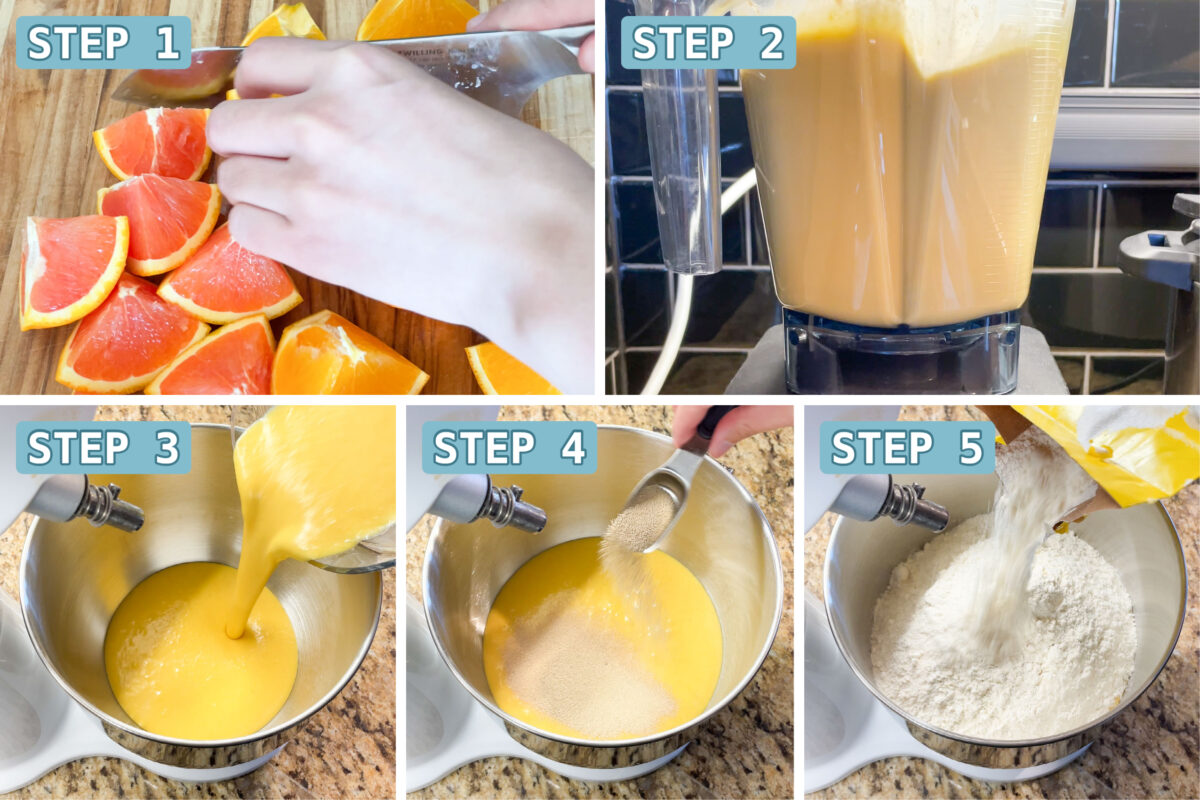
Step 1: Rinse each orange thoroughly and cut into eight pieces. Remove any seeds or blemished skin, but keep the peels on. This is crucial for getting a strong orange flavour in your paska!
Step 2: Add oranges, aquafaba or soyfaba, coconut milk, melted butter, sugar, and salt to a blender or food processor. Blend on high speed until smooth (it took me 40 seconds using a Vitamix).
Step 3: Pour this blended purée into the bowl of a stand mixer.
Step 4: Scatter yeast over the mixture.
Step 5: Add 6 ½ cups of flour.
Knead Dough
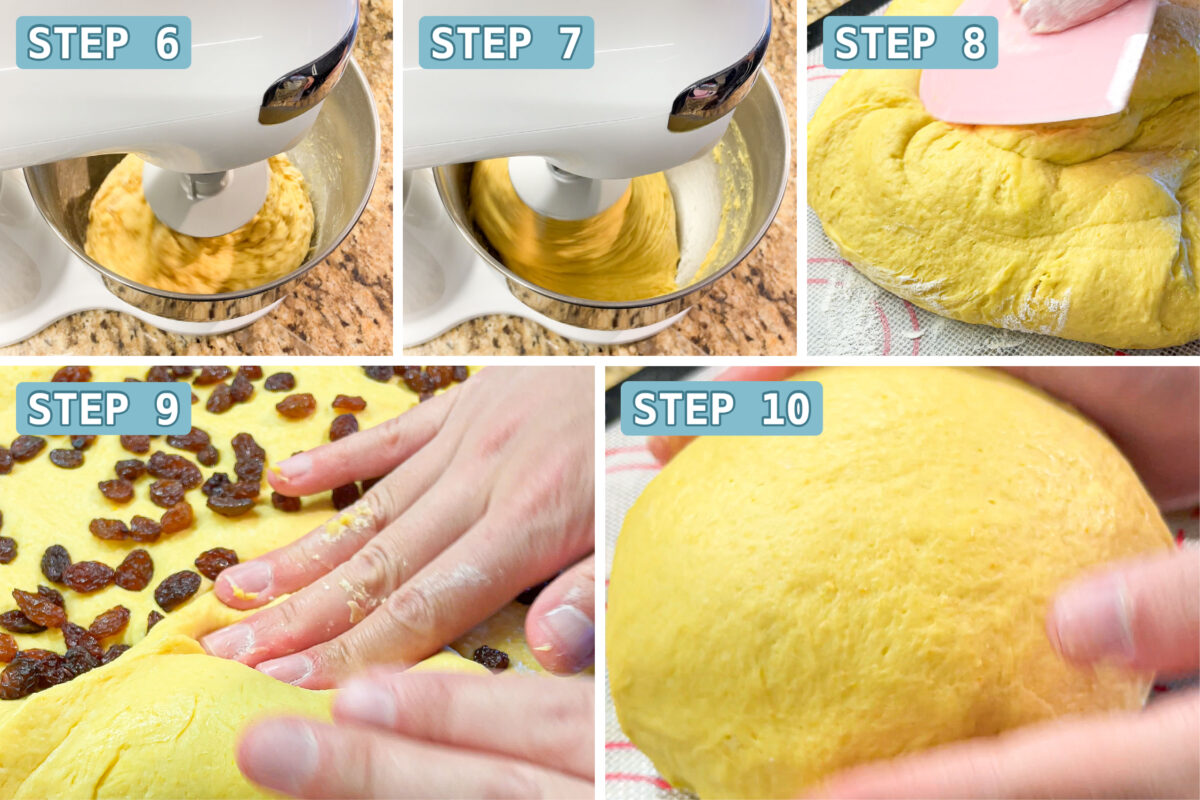
Step 6: Using the dough hook attachment, mix on medium-low speed (on KitchenAid and Cuisinart models, Speed 2 is recommended for kneading dough).
Step 7: Once all the flour has been incorporated, continue kneading on the same speed for 12 minutes. Towards the end, the ball will start pulling away from the sides of the bowl, but it won’t fully form into a ball.
Step 8: Turn the dough onto a lightly floured surface and shape it into a ball. (A bench scraper is helpful here.) It should be very soft and tacky, but if it’s too sticky to work with, sprinkle over some additional flour and fold it in.
Step 9: If using raisins, fold them in now: flatten the dough and scatter raisins all over, like you’re making raisin bread. Then fold all the corners in and knead a few times.
Step 10: Shape it back into a ball. Grease the bowl and put the dough ball back inside. Cover it with plastic wrap or a damp towel to keep the surface from drying out.
Wondering why sometimes your dough is stickier than other times, even if you use the same amount of ingredients? There are many factors that influence bread hydration, like ambient humidity, absorption capacity of flour, and more. Check out the science behind baking bread dough in my Vegan Master Sweet Dough post.
Shape Dough
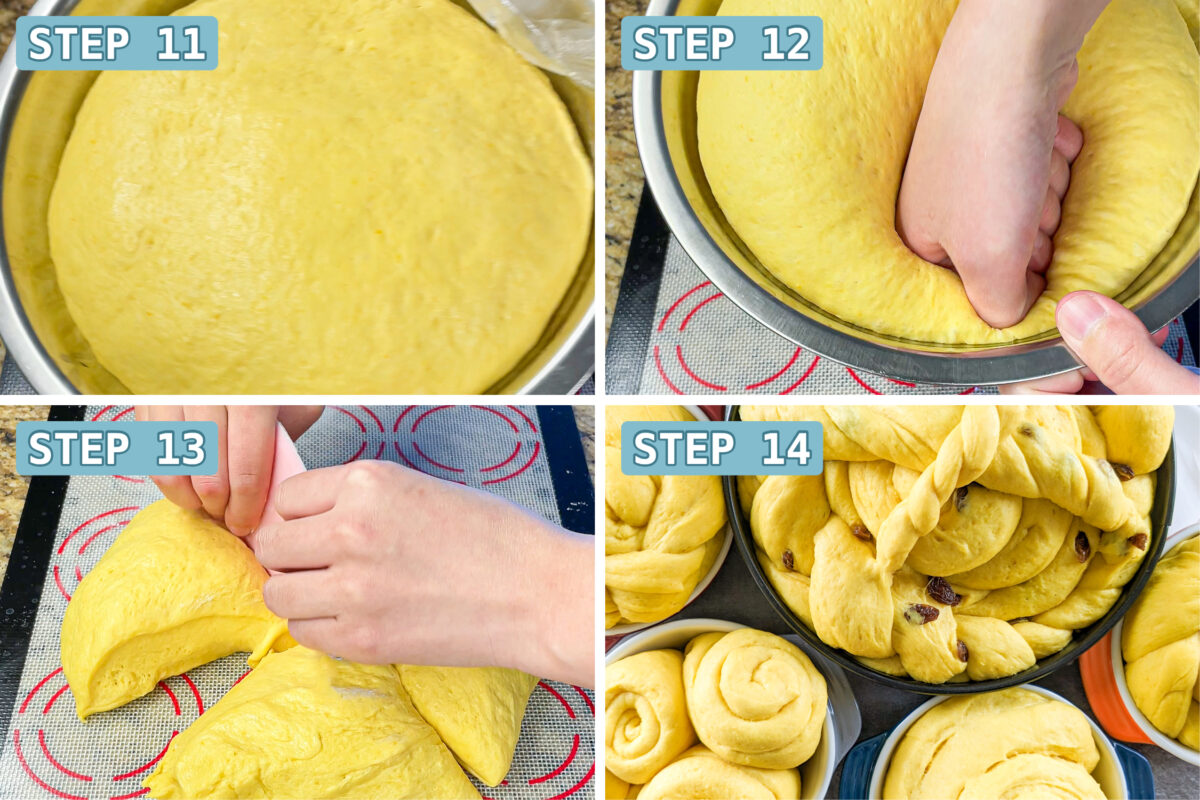
Step 11: Let rise in a warm place for 1 to 1½ hours, or until doubled in size. I used my Instant Pot’s Yogurt setting for the perfect temperature.
Step 12: Once risen, punch down the dough. No need to be gentle, get all the air out!
Step 13: Turn dough out onto a clean working surface. Cut into 16, 8, 4, or 2 pieces depending on how big you want to bake your paska. Dividing into 16 pieces will make baby paskas that can be baked in 8-oz ramekins. 2 pieces will give you two full-sized loaves (baked in 9×5 inch loaf pans or 7-inch round cake pans). Or go for somewhere in between depending on the size of your baking vessels.
Step 14: There are numerous ways to shape your paska. They are often braided elaborately and decorated with religious symbols for Easter. However, it’s common to see them baked as a simple loaf, too. So it all depends on how much effort you feel like putting in. I’ll demonstrate a few different techniques that are fairly easy to do but look great:
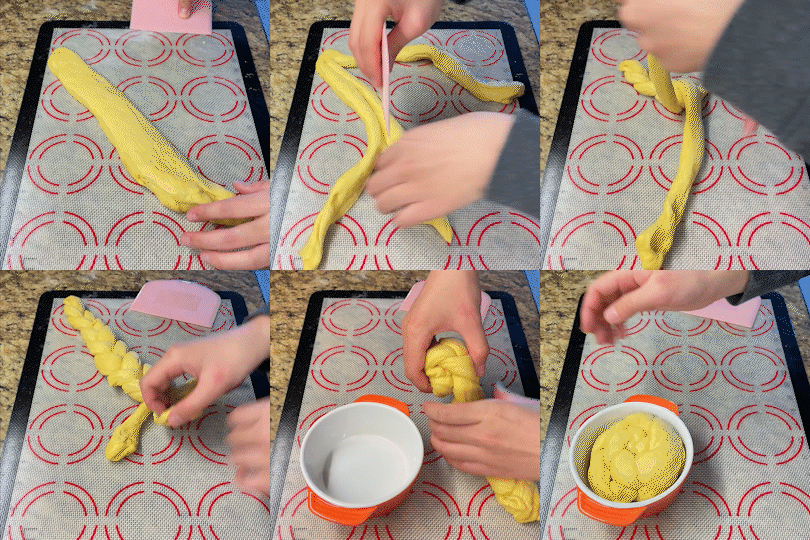
Simple Braid: Flatten each piece of dough into a long strip, then cut it into three strands. Pull the outer strands into the center, alternating between each side, until you reach the end of the dough. Roll up the braid and set it in a small baking dish.
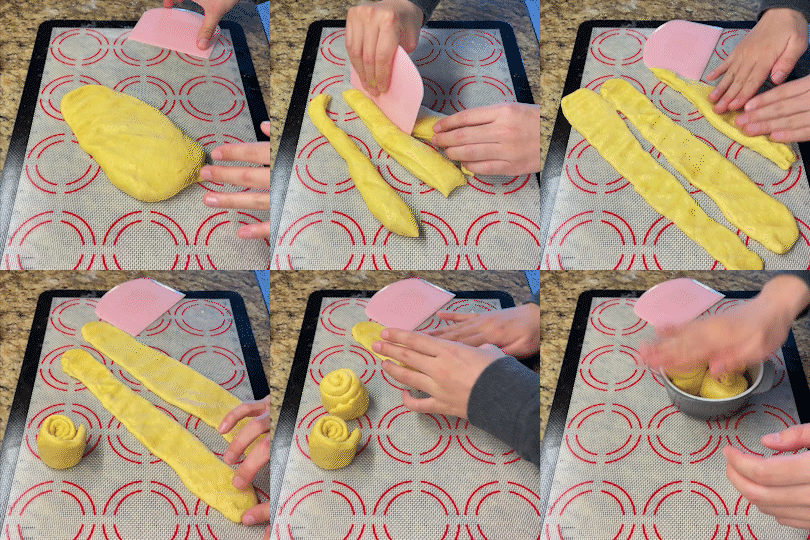
Triple Swirls: Flatten the piece of dough and cut it into three long, narrow strips. Roll each strip up (like you’re rolling cinnamon rolls or Hawthorn Leather). Nestle each roll side by side into your baking dish.
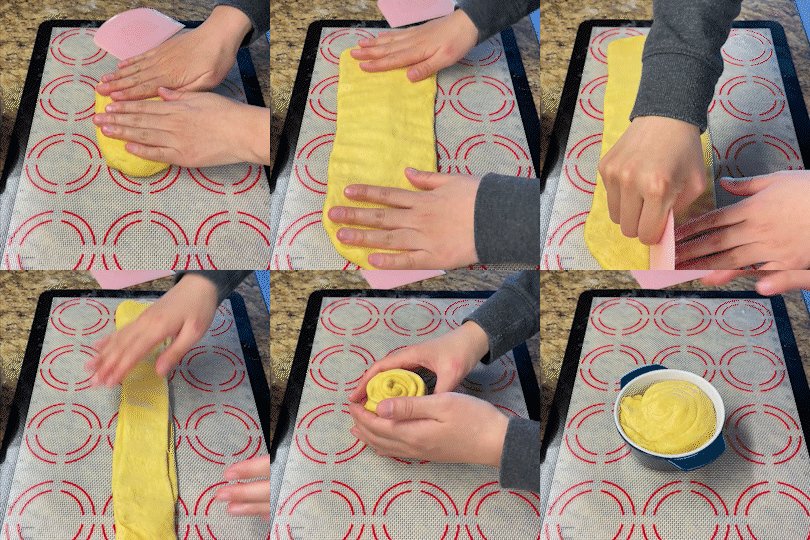
Giant Roll: Flatten the dough and cut it into two long, narrow strips. Layer one strip on top of the other and roll it up together. Firmly press it into the baking dish.
The ornamental finishes on paska are given much attention, because this bread is taken to church on Easter morning along with small portions of other foods to be blessed. This ceremony is very impressive. While the priest chants prayers and blesses rows and rows of baskets, with a lighted candle in each one, set on a green lawn, the choir sings the traditional Easter hymn, “Khrystos Voskres” (Christ is Risen).
Savella Stechishin, Traditional Ukrainian Cookery
Bake Paskas
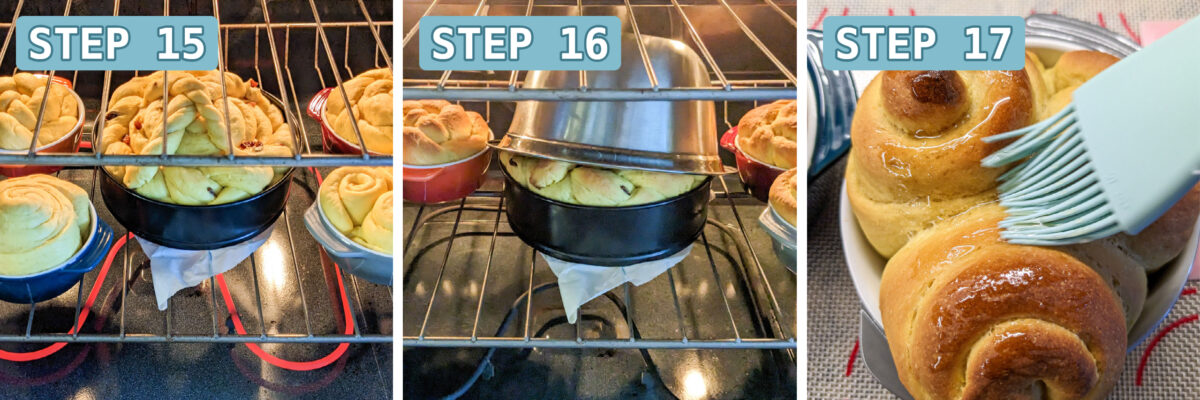
Step 15: Once you’ve shaped the paskas, cover them again and let rise for a second time for 45 minutes. They shouldn’t be doubled in size (which would indicate they’re slightly overproofed), but more like 1.5x in size. Meanwhile, preheat the oven to 375 °F.
Step 16: Set the paskas on a rack in the bottom third of the oven. Bake anywhere from 25 minutes (small breads) to 45 minutes (full-size loaves). If the top is browning too quickly, cover with aluminum foil or use a big stainless steel bowl as a lid.
Step 17: Optionally, brush each vegan paska with apricot jam or melted butter for a glossy coat.
Make Ahead & Storage Tips
Make ahead: You can make the paska dough and save the shaping and baking for a later day. Simply follow all the instructions up to and including kneading the dough. But instead of letting it rise, cover it tightly and put it in the fridge. You can leave it refrigerated for up to four days before baking. When ready to bake, take it out of the fridge and put it in a warm place, ie. wherever you usually rest your dough. It will take a while to warm up so the first rise will take anywhere from 3 to 6 hours instead of the usual 1 hour. After that, you can continue with the rest of the steps as usual.
Storage after baking: Store baked paska in a paper bag or bread box at room temperature for up to 3 days. (Paper is preferred over plastic as it is better at keeping the bread from moulding.)
Storage in freezer: If you can’t finish paska within three days, I recommend freezing the rest instead of refrigerating it. Refrigerated paska goes stale quickly. Instead, tightly wrap it up in plastic and chuck in the freezer until you want to eat it. The best way to thaw frozen bread is to take it straight from the freezer and reheat it in the oven for 20–30 minutes at 325 °F.
Recipe FAQs
Paska is a traditional Easter bread typically made with eggs, butter, sugar, and flour, eaten in Eastern Europe and its diaspora. It’s believed to be derived from the Old Slavic word paskha, meaning Easter. In fact, even today the word “paska” in the Russian language still means Easter. However, in Ukrainian, “paska” refers to the bread itself. It is a symbol of renewal and rebirth, representing the joy and hope of the Easter season. (Fun fact: coincidentally, paska is a rude word in Finnish, so in Finland this bread is called Pääsiäisleipä or “Easter bread.”)
Paska is moist and soft with a sweet and buttery flavor, enhanced by orange zest. It tastes similar to brioche but is denser and has a lovely orange flavour. You can also top it with a frosting or sweet glaze to turn it into more of a dessert.
Per Savella Stechishin, both paska and babka are Ukrainian Easter specialties and both are usually braided. But babka is baked in loaf pan while paska is typically baked in the round. Babka is also sweeter than paska and usually has some sort of sweet filling like cinnamon sugar, candied peels or raisins, or chocolate.
Paska and panettone are definitely similar since both are enriched breads baked to celebrate holidays. Though they both contain similar add-ins like raisins, candied fruit, and have a citrus flavour, they’re not the same. Panettone is Italian and is a Christmas specialty, while paska is Eastern European, with likely Ukrainian origins, and is made during Easter. The process for making panettone dough is also much longer since it starts with a “mother dough” (lievito madre), similar to sourdough.
Paska has been a central part of Eastern European Easter celebrations for centuries, especially in Ukraine. Here is an excerpt from Savella Stechishin’s seminal book, Traditional Ukrainian Cookery: “With the break of dawn on Easter Sunday a special Resurrection Service is held with a procession around the church. The most beautiful aspect of the service is the joyful heralding of a risen Christ in the singing of the traditional Ukrainian hymn “Christ is Risen” (Khrystos Voskres). The whole congregation sings in unison with a heightened feeling. At the conclusion of the service, rows and rows of food-laden baskets with a lighted candle in each are blessed by the priest. In favorable weather this impressive ceremony is performed outside on the green church lawn. Food baskets covered with richly embroidered napkins contain Easter bread called “paska” and a selection of various Easter foods … People greet one another with the traditional Easter greeting “Khrystos Voskres!” (Christ is risen!), to which the reply is “Voistyno Voskres!” (He is risen indeed!).”
More Spring Recipes
Recipe Card
Did you make this recipe? Please consider leaving a rating below to let me know how you liked it.
You can also take a picture and tag me on Instagram @earthtoveg, I will shout you out in my Stories!
Vegan Paska (Eastern European Easter Bread)
Use Imperial/Metric buttons below to toggle between volume vs weight measurements. I recommend weighing out your ingredients for best results.
Equipment
- Blender or food processor
- Stand mixer (with dough hook attachment)
- Bench scraper
- Loaf pan, cake pan, or ramekins
Ingredients
- 2 oranges see Note 1
- ¾ cup aquafaba
- 1 cup coconut milk see Note 2
- ½ cup butter, melted
- ¾ cup sugar
- 1 tsp salt
- 1 tbsp instant yeast
- 6½ to 7 cups bread flour or all purpose flour
- 1 cup raisins *optional
- 2 tbsp runny apricot jam or melted butter *optional
Instructions
- Rinse each orange thoroughly and cut into eight pieces. Remove any seeds or blemished skin, but keep the peels on.
- Add oranges, aquafaba or soyfaba, coconut milk, melted butter, sugar, and salt to a blender or food processor. Blend on high speed until smooth (it took me 40 seconds using a Vitamix).
- Pour the mixture into the bowl of a stand mixer. Scatter yeast over top, followed by 6½ cups of flour.
- Using the dough hook attachment, mix on medium-low speed (see Note 3). Once all the flour has been incorporated, continue kneading on medium-low speed for 12 minutes. Towards the end, the ball will start pulling away from the sides of the bowl, but it won’t fully form into a ball.
- Turn out the dough onto a lightly floured surface and shape into a ball. A bench scraper is very helpful for this step. It should be very soft and tacky, but if it’s too sticky to work with, add up to 1/2 cup of additional flour by sprinkling it over the dough and folding it in (see Note 4).
- Grease the bowl and put the dough ball back into the bowl. Cover with plastic wrap or a damp towel and let rise in a warm place for 1 to 1½ hours, or until doubled in size.
- Punch down the dough. No need to be gentle, get all the air out! If using raisins, fold them in now (see Video or Step-by-Step images for how to do this).
- Cut into 16, 8, 4, or 2 pieces depending on how big you want to bake your paska. Dividing the dough into 16 pieces will make baby paskas that can be baked in 8-oz ramekins. Dividing into 2 pieces will give you 2 full-sized loaves (baked in 9×5 inch loaf pans or 7-inch round cake pans). Or go for somewhere in between depending on the size of your baking vessels.
- Shape or braid each piece of dough as desired (see Video or Step-by-Step images to see how I shaped mine).
- Cover and let rise again for 45 minutes, until not quite doubled in size, but more like 1.5x in size. Meanwhile, preheat the oven to 375 °F.
- Bake anywhere from 25 minutes (for small breads, ie. 16 pieces) to 45 minutes (for full loaves, ie. 2 pieces). If the top is browning too quickly, cover with aluminum foil or use a big stainless steel bowl as a lid.
- Optional: Brush each paska with apricot jam or melted butter as soon as it comes out of the oven for a glossy coat.
Notes
- As with every baking recipe on this site, I strongly recommend weighing your ingredients. With something so variable in size like oranges, I can’t possibly guarantee your oranges are the same as mine. And everyone has a different technique for measuring flour—the New York Times found that a cup of flour can weigh anywhere from 4 to 6 oz depending on the scooping technique—so for the best possible results, please measure by weight.
- Full-fat coconut milk is recommended for best flavour. It also makes the dough softer and easier to work with than if you use lite coconut milk or substitute a different milk.
- Use the setting recommended by your mixer for kneading bread dough to avoid burning out the motor. On KitchenAid and Cuisinart models, this is Speed 2.
- Even if you weigh out your ingredients, you may find your dough is a bit stickier than expected due to factors like time of year (summer is typically more humid than winter), juicier oranges, different water absorption capacity of flour, etc… So if your dough is too sticky, then sprinkle on a bit more flour to make it more manageable. But try to add as little extra flour as possible. The higher the hydration of this bread, the better it tastes.

What a great Easter treat. Love the strong orange flavour.
Thank you Paulina! Hope you had a great Easter!