Vegan Yogurt goes back as far as 1910, when scientist Li Yuying propounded the possibility of making yogurt from soy milk. Ferment your own Soy Cashew Yogurt at home in either a yogurt maker, Instant Pot, or just a warm spot in your kitchen. Tangy, naturally creamy and thick, with no additives. Only 3 ingredients: Homemade Soy Milk, cashews, and starter culture. (You can use storebought vegan yogurt as your starter.)
Why This is the Best Vegan Yogurt Recipe
- Easy: Can be made using the Instant Pot, yogurt maker, or simply any draft-free area of your home, like an oven.
- Truly fermented: This yogurt takes around 24 hours to make, but the patience is well worth it. Some “quick” vegan yogurt recipes consist of squeezing lemon juice into soy milk or tofu. But while that may mimic the taste and texture of yogurt, it loses all the nutritious probiotic properties. This homemade yogurt is loaded with gut-beneficial bacteria and all the other health benefits of fermented foods.
There are two basic types of soy yogurt: fermented and non-fermented. The fermented type is usually made from soymilk in the same way as a typical dairy yogurt. The non-fermented type is usually made by blending silken tofu (sometimes with fruits and other ingredients) until it attains the smooth consistency of yogurt – but lacks the sourness.
William Shurtleff and Akiko Aoyagi, History of Soy Yogurt, Soy Acidophilus Milk and Other Cultured Soymilks
- Sugar-free: The reason many vegan yogurt recipes tell you to add sugar is because soy milk has 3× less sugar than cow’s milk, and sugar is what the yogurt bacteria feed on. The reasoning is that you need to add extra sugar to soy milk to help the bacteria grow. But throughout the years of making my own soygurt, I’ve always got along fine without having to add any sugar. You can definitely add sugar to give it a bit of sweet taste (I like adding 1–2 tbsp of sugar to the yogurt after fermentation, to cut the soy taste), but it’s not necessary! This also makes it perfect to use in savoury recipes like Borani Banjan or Spinach Artichoke Dip.
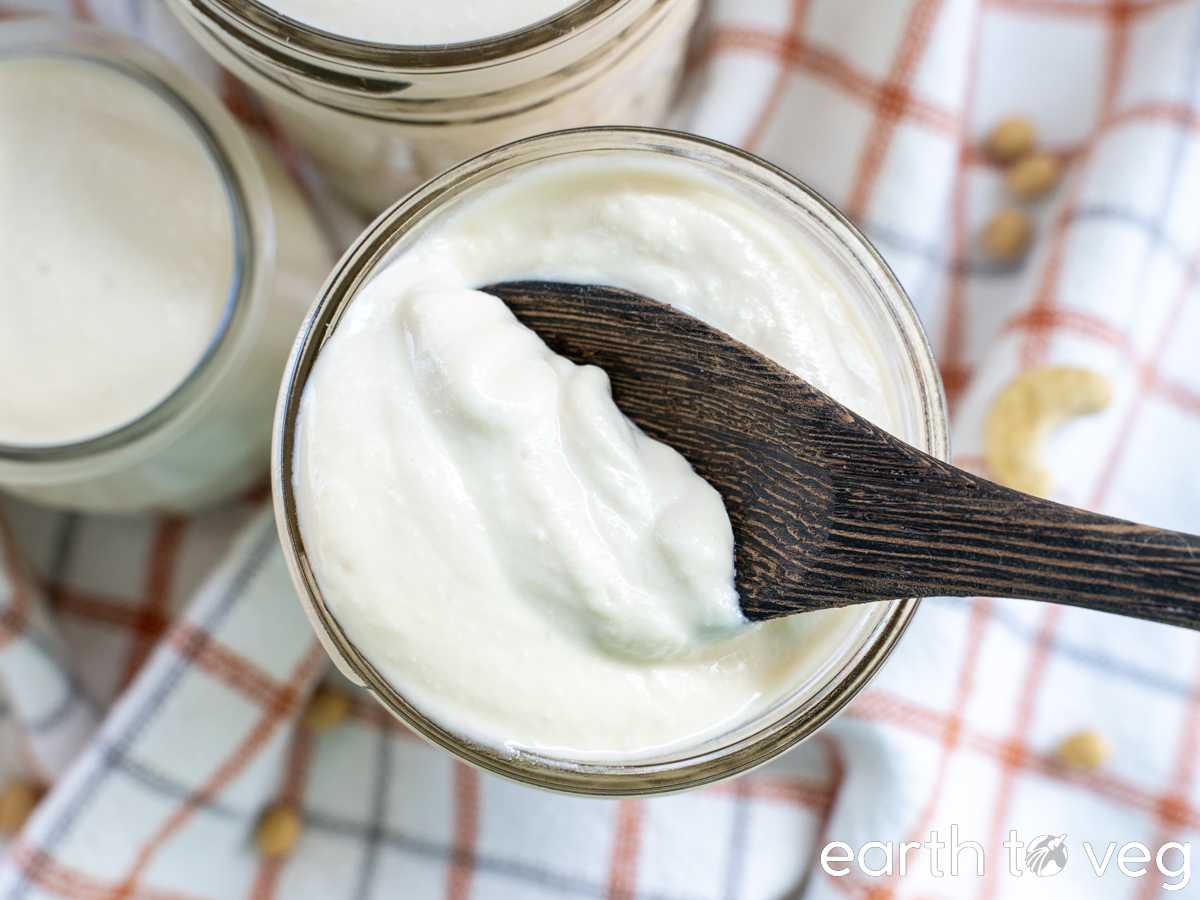
- Creamy texture: Check out this comparison between soy-cashew yogurt vs pure soy yogurt. The cashew yogurt has a thick and smooth texture while the soy yogurt looks like jello or silken tofu. The soy-cashew yogurt has a much nicer mouthfeel too. Due to the extra fattiness from the cashews, it’s so satisfying to eat.


Optimal Yogurt Temperature
The most frequently recommended range for fermenting yogurt is 105–115 °F (40–45 °C). This is the optimum growth temperature for the two most common (and traditional) bacterial strains used in yogurt-making: Streptococcus thermophilus and Lactobacillus bulgaricus. They are both thermophilic, meaning they like high temperatures.
However, many yogurt starters and storebought vegan yogurts contain more than just these two strains. Although the bacterial cultures below are not considered traditional yogurt starters, they not only help the fermentation along but also add probiotics:
- Bifidobacterium bifidum: optimal temperature of 100 °F (37 °C)
- Lactobacillus acidophilus: optimal temperature of 100 °F (37 °C)
- Lactobacillus casei: optimal temperature of 85 °F (30 °C)
- Lactobacillus rhamnosus: optimal temperature between 60–105 °F (15–40 °C)
Note that all of these four species are mesophilic (they live at moderate temperatures).
In general, all lactic acid bacteria grow best somewhere between 85 °F (30 °C) and 115 °F (45 °C). My takeaway: maintaining the yogurt at around 105 °F (40 °C) is a happy medium between the thermophiles and mesophiles, ensuring you’ll get a good mix of probiotics with every spoonful.
Yogurt Bacteria Death Temperature
Surprisingly, a Google search for this question yields a wide range of answers. Some websites say you can go as high as 140 °F, others warn against anything higher than 100 °F. The reason for all this confusion may be because different bacterial strains have different temperature tolerances. Some can tolerate up to 175 °F (80 °C), however, most die closer to 160 °F (70 °C).
In any case, I wouldn’t recommend going anywhere close to these temperatures. Stick to somewhere within their optimal temperature range (105–115 °F or 40–45 °C) to keep the bacteria happy and healthy.

Instant Pot Advantages
Most Instant Pot models (including Duo, Ultra, and Viva) come with a “Yogurt” setting that is perfect for making vegan yogurt. Here are some benefits to using the Instant Pot method over an oven, slow cooker, or yogurt maker:
- One pot recipe. Using another method, you’d need to use another pot to heat the soy milk on the stove before adding the starter. But with this recipe, the pasteurization, inoculation, and fermentation all take place in the Instant Pot. No need to even wash it between steps.
- Consistent results. While yogurt makers definitely yield consistent results, the same can’t be said for the oven or slow cooker. The temperature of an oven (or oven light) or slow cooker can vary between different homes. The Instant Pot, however, has an internal temperature sensor that makes sure it stays at the optimal yogurt temperature.
- Set it and forget it. The timer feature of the Instant Pot means it will beep to let you know when it’s ready.
- Make a huge batch at once. Yogurt is one of the few things that I don’t mind making a lot of at once. I usually finish all of it by the end of the week, and any leftovers freeze well. Using the Instant Pot, you can make a big tub of vegan yogurt all at once.
- Doesn’t heat up your house. Since everything happens in the Instant Pot, which is pretty good about conserving heat, you don’t need to turn on the stove or the oven. It’s an absolute lifesaver in the summer!
- Ditch the unitaskers. Actually, this is unfair to my yogurt maker, since I’ve also used it to make natto, so it’s more of a “duotasker.” But for people living in small spaces, an Instant Pot can do all the things a yogurt maker can, plus much more.
Sorry, did this come off sounding like an ad? I just really like my IP! That said, I definitely do still use my yogurt maker to make yogurt from time to time. And back when my kitchen was more limited, I even had success using just the oven. So I will cover all three methods in my instructions.
Instant Pot “Yogurt” Setting: Normal vs More vs Less
If you own an Instant Pot, you might have wondered to yourself:
What’s the difference between the different modes (Normal, More, Less) on the Instant Pot’s “Yogurt” function?
According to the IP DUO manual:
- Normal: for fermenting yogurt. Heats the contents to 96.8–109.4 °F (36–43 °C).
- More: for pasteurizing milk before adding starter. Heats the contents to 160–180 °F (71–83 °C). Only use this mode for heating the soy milk in Step 2; do not use it for fermenting the yogurt or the bacterial cultures will all die.
- Less: for making jiu niang (a Chinese fermented rice dish). Heats the contents to 86–93 °F (30–34 °C), which is on the low side for optimal yogurt culture activity.
What You’ll Need
A few notes on the three ingredients used in this yogurt recipe:

Soy Milk: For the yogurt base, I use my Homemade Soy Milk recipe, which can be cooked in the Instant Pot or on the stove. I prefer to make “double-strength soy milk” for my yogurt which means using half as much water as I usually use for drinking soy milk (so 4 cups instead of 8 cups). This results in a thick, luscious yogurt, similar to Greek yogurt. (Alternatively, you can substitute with storebought soy milk. But be prepared for a thinner yogurt.)
Can I use a different plant-based milk, like almond, coconut, or oat milk?
I have heard of people having success with other milk bases. However, I haven’t tried any of these myself so I can’t guarantee the results will be the same.
Cashews: Raw cashews add richness and thicken up the yogurt while maintaining a neutral flavour. You won’t be able to taste the cashews at all after fermentation, but they’re an absolutely crucial ingredient. Without the added fat and fiber from the cashews, you’ll end up with a uninspiring pot of sour yet bland soygurt that has the texture of silken tofu. 😿
Yogurt Starter: Since yogurt is a fermented food and requires live bacterial cultures, you need a source of probiotic bacteria (called “starter”) to get it going. You can buy dried starter cultures online (they come in a powdered form which you sprinkle directly into the soy milk), but I use storebought vegan yogurt because it’s cheaper. And it works great! I’ve made this recipe with the following storebought brands: Maison Riviera, President’s Choice, Silk, and YoSo. Any plain yogurt should work as long as it contains live probiotics. If the ingredients list includes “active bacterial cultures,” you’re good.
Tip: Save 1/2 cup of your homemade yogurt to use as the starter for the next batch of yogurt. Do this every time you make yogurt and you can maintain a self-perpetuating starter!
Step-by-Step Process

Step 1: Start by cooking soy milk according to the recipe, then cool it down to 120 °F. This pasteurizes the soy milk and ensures a safe environment for the yogurt bacteria to thrive.
Note: If you’re using storebought soy milk, you’ll first need to pasteurize it to kill off any potentially harmful bacteria. Do this by pouring the milk into a clean and empty Instant Pot. (Do not cover with the lid.) Select the “Yogurt” setting on More mode; the display should flash boiL and beep three times. When the Instant Pot beeps again and the display changes to Yogt, it’s finished the heating process. Leave the soy milk to cool until it reaches 120 °F, then proceed to the next step.
Tip: A quick test to see if the milk is cool enough is to dip a clean finger into the soy milk. If it feels a little bit warm but not hot, you’re good to add the starter.

Step 2: Add the cooled soy milk, cashews, and yogurt starter culture to a clean blender jar. Blend on high speed until very smooth.
Step 3: Pour the mixture into a large glass bowl or container (at least 8-cup capacity). I use a 7-cup Anchor Hocking container and it’s just a little too small but does the job.
Step 4: Cover loosely with a lid or plastic wrap. This prevents condensation from dripping onto the yogurt as it ferments.
Now follow the instructions below for either the Yogurt Maker method, Instant Pot method, or Oven method.
Yogurt Maker Method

Place the container in your yogurt maker and turn it on. Set the timer to your preferred fermentation time. The longer the fermentation, the more tangy the yogurt becomes. I’m using an old Euro Cuisine Automatic Yogurt Maker, which has a maximum run time of 15 hours. I like it best between 12–16 hours, but you may want to experiment with a few batches to figure out what you prefer.
Instant Pot Method
Pour 1 cup of warm water back into the now-empty Instant Pot and set it up with a trivet. Put the yogurt mixture on top of the trivet.
Secure the lid on the Instant Pot. (You can leave the steam vent on the lid in either the venting or sealing position.) Select the “Yogurt” setting again and set it to Normal mode.
Note: You can adjust the time to anywhere between 8 to 24 hours. The longer the fermentation, the more tangy the yogurt becomes. I like it best between 12–16 hours, but you may want to experiment with a few batches to figure out what you prefer.
Oven Method
If you don’t have a yogurt maker or Instant Pot, don’t worry. As long as your home is reasonably warm (like around 20 °C) and have a draft-free area like an oven, you can leave your yogurt there to ferment. It will take longer because of the cooler temperature, but I’ve had good results just by letting it sit there for 24 hours. No need to leave the oven light on.
Don’t Forget to Stir
Once the yogurt has fermented to your liking, stir it up until it reaches a smooth and even consistency. Check out the difference before and after stirring:

If you plan on making yogurt again soon, remember to scoop out 1/2 cup of yogurt (using a clean spoon!) and save it to use as the starter for the next batch.
I’m not a fan of plain yogurt. Can I add sugar/fruits/flavour extracts/other mix-ins to the yogurt?
You can go wild with customizing the flavour of this basic yogurt. I love to make a refreshing strawberry yogurt drink which is simply equal amounts of homemade soygurt and ripe strawberries blended together until smooth. Super fruity and tangy, and hits the spot on a hot day or after a sweaty workout. I also use it in this Vegan Strawberry Cake. Another easy variation is this Haskap Jam Yogurt (you can use any type of fruit jam), it reminds me of the fruit-on-the-bottom yogurts that I used to eat.
Make Ahead & Storage Tips
Fridge: Being a fermented food, homemade yogurt is quite resilient and can last for up to two weeks in the fridge. However, if you plan on saving the starter and using it for the next batch, it’s recommended to use it within 7 days.
Freezer: Yes, you can freeze homemade vegan yogurt. The texture will look wacky and separated when it thaws, but give it a good whisk to bring it back into a nice smooth consistency. The flavour isn’t impacted by the freezing process. However, I’m not sure if freezing does anything to kill or inactivate the live cultures. I’m planning to freeze the starter for my next batch, to see if it still ferments successfully after defrosting. I’ll update this page with the results.
Recipe FAQs
The flavour of homemade cashew soy yogurt is distinct from both dairy yogurt and storebought vegan yogurt. It kind of reminds me of tofu blended with Greek yogurt. Doesn’t sound too good, does it? Soygurt can definitely be an acquired taste! I wasn’t a huge fan when I first tasted my first batch, but after going through a few jars I fell in love with it. Here’s a few tips:
Mix it up thoroughly. No one likes eating lumpy yogurt. Stir it well to get a familiar smooth, creamy yogurt consistency.
Add sugar. Just 1–2 tbsp of sugar added to an entire batch of yogurt helps to cut the soybean taste.
Chill it. This could be personal preference, but I prefer thoroughly chilled yogurt over warm or lukewarm yogurt. The soy flavour is significantly less noticeable with cold yogurt too.
Soy yoghurt can be a very healthy addition to your diet. It’s a good source of plant-based protein, essential amino acids, vitamins, and minerals. Additionally, fermented yoghurts contain probiotics, which are beneficial bacteria that support gut health. For those with lactose intolerance or milk allergies, or for vegans, it can serve as a valuable alternative to dairy-based yogurts. However, storebought soy yogurts may contain added sugars and artificial flavors, which could detract from the health benefits. It’s important to check the labels, or make your own homemade soy yoghurt.
While both are fermented, soy yogurt and dairy yogurt fundamentally differ in their base ingredients: soy yogurt is made from soybeans, while dairy yogurt is made from animal milk, usually cow’s. This leads to differences in their nutritional content. Dairy yogurt typically has more sugar and calcium. Soy yogurt has a slightly higher protein content.
Cashew yogurt can be a healthy option if it’s made from only whole food ingredients. Cashews are high in unsaturated fats (the heart-healthy kind), fiber, and minerals such as magnesium, copper, and zinc. Additionally, it contains plant-based protein, which is boosted by the soy milk in this recipe. It’s a suitable choice for vegans, those with dairy allergies, or lactose intolerance.
Yes, cashew yogurt typically contains probiotics. The fermentation process that transforms the cashews into yogurt involves beneficial bacteria. These live microorganisms can provide benefits for digestive health when consumed. The specific types and amounts of probiotics can vary between different brands of cashew yogurt, so it’s always a good idea to check the product labeling. Keep in mind that not all cashew yogurts will have a significant amount of probiotics, especially if they’ve been subjected to heat processing, which can kill these beneficial organisms. Always opt for brands that specify “live and active cultures” on the label, or make your own cashew yogurt at home.
Recipes that Use Yogurt
Savoury Uses for Yogurt
- Yogurt over Mămăligă is a traditional Romanian pairing.
- Dairy-Free Spinach Artichoke Dip uses vegan yogurt to give it a creamy texture.
- Ghormeh Sabzi is an Iranian stew which is often served with plain yogurt or cucumber yogurt.
- Borani Banjan is an Afghan eggplant dish topped with cilantro yogurt.
- Yogurt and Silsi are mixed with bread to make fata, an Eritrean lunch specialty.
Recipe Card
Did you make this recipe? Please consider leaving a rating below to let me know how you liked it. You can also take a picture and tag me on Instagram @earthtoveg, I will shout you out in my Stories!

Vegan Soy Cashew Yogurt (Instant Pot or Stove)
Equipment
- Blender
- Yogurt maker or Instant Pot (*optional; use Oven method if you don't have either)
- 1 Large glass bowl or container (7- or 8-cup capacity)
Ingredients
Switch between volume vs weight measurements:
- 1 double-strength batch Homemade Soy Milk see Note 1
- 1 cup raw cashews
- ½ cup storebought vegan yogurt only required for first batch; see Note 2
Instructions
- Start by cooking soy milk according to the recipe, then cool it down to lukewarm (120 °F or lower; doesn’t have to be exact). This pasteurizes the soy milk and ensures a safe environment for the yogurt bacteria to thrive. See Note 1 if using storebought soy milk.
- Add cooled soy milk, cashews, and yogurt starter culture to a clean blender jar. Blend on high speed until very smooth.
- Pour the mixture into a large glass bowl or container.
- Cover loosely with a lid or plastic wrap. This prevents condensation from dripping onto the yogurt as it ferments.
- Now follow the instructions below for either the Yogurt Maker method, Instant Pot method, or Oven method. Once the yogurt has fermented to your liking, stir it until it reaches a smooth and even consistency.
Yogurt Maker Method
- Place the container in your yogurt maker and turn it on. Set the timer to your preferred fermentation time (see Note 3).
Instant Pot Method
- Pour 1 cup of warm water back into the now-empty Instant Pot and set it up with a trivet. Put the covered yogurt mixture on top of the trivet.
- Secure the lid on the Instant Pot. (You can leave the steam vent on the lid in either the venting or sealing position.) Select the "Yogurt" setting again and set it to Normal mode. Adjust the time to anywhere between 8 to 24 hours (see Note 3).
Oven Method
- If you don’t have a yogurt maker or Instant Pot, don’t worry. Just preheat your oven to the coolest temperature setting (around 170 °F to 200 °F) for 5 minutes, then turn it off. Stick your hand in there to make sure it feels warm but not hot; if it feels hot, let it cool down a bit before adding the yogurt.
- Then set your container of yogurt on one of the oven racks and leave it inside with the door closed for 12 to 24 hours. This method is less precise because every oven differs in its insulation capabilities, and you may want to turn on the oven for a few seconds every couple of hours just to make sure it stays warm enough.
Notes
- For the yogurt base, I use my Homemade Soy Milk recipe, which can be cooked in the Instant Pot or on the stove. I prefer to make “double-strength soy milk” for my yogurt which means using half as much water as I usually use for drinking soy milk (so 4 cups instead of 8 cups).
- Alternatively, you can substitute with storebought soy milk. But be prepared for a thinner yogurt. You’ll first need to pasteurize it to kill off any potentially harmful bacteria. Do this by pouring the milk into a clean and empty Instant Pot. (Do not cover with the lid.) Select the “Yogurt” setting on More mode; the display should flash
boiLand beep three times. When the Instant Pot beeps again and the display changes toYogt, it’s finished the heating process. Leave the soy milk to cool until it reaches 120 °F, then proceed to the next step.
- Alternatively, you can substitute with storebought soy milk. But be prepared for a thinner yogurt. You’ll first need to pasteurize it to kill off any potentially harmful bacteria. Do this by pouring the milk into a clean and empty Instant Pot. (Do not cover with the lid.) Select the “Yogurt” setting on More mode; the display should flash
- I’ve made this recipe with the following storebought brands: Maison Riviera, President’s Choice, Silk, and YoSo. Any plain yogurt should work as long as it contains live probiotics. If the ingredients list includes “active bacterial cultures,” you’re good.
- If you plan on making yogurt again soon, don’t forget to scoop out 1/2 cup of yogurt (using a clean spoon!) and save it to use as the starter for the next batch.
- Yogurt should be fermented for at least 8 hours, up to 24 hours. The longer the fermentation, the more tangy the yogurt becomes. I like it best between 12–16 hours, but you may want to experiment with a few batches to figure out what you prefer.
I’ve made your soy milk with great success (even though I only learned after the fact that I should’ve double-strengthed it to make the yogurt I had planned!) Tomorrow I’ll make another batch, this time with the liquid halved or the soy beans doubled. Thank you for your clear instructions on that. I’m a little puzzled about the instant pot method for soy yogurt, though. Why can’t I ferment the yogurt in the instant pot insert, and then incubate it in the same stainless steel insert? Until going vegan, I used my instant pot that way to incubate dairy yogurt. Why is it necessary to ferment and incubate (in water) in the glass container? I don’t have any suitable containers for my 2 litre batches. Jars are too tall. Bowls are too wide. I’ve tweaked my instant pot temperature to be perfect for yogurt making, if that makes a difference. Thanks for any explanations about the need for glass containers bathed in water. Extra thanks for including the temperatures for the various strains in the starter! I look forward to exploring your website for other great vegan recipes.
Good question Susan, you can definitely make the yogurt straight in the IP insert, I’ve done that a few times. I just found that the bottom of the pot would develop this sort of rubbery spongy skin, probably because the bottom gets a little too hot during incubation as it is directly in contact with the heating element. Also, I use my IP to make a lot of savoury recipes too and find that the yogurt occasionally picks up some weird flavours from the stainless steel haha. Finally, when I make the yogurt in a glass container I can store it in the fridge directly in the container so it’s less mess for me. So all that to say, the container-in-pot method is my preferred way but fermenting it right in the stainless steel will work just fine.
(Btw, you can still make the yogurt using regular-strength soy milk, it will just be a bit thinner!)
Such a quick reply! Timely too, because my soy milk is cooling prior to adding the cashews and starter. Many thanks for the clarification. I have one more very simple question for you and I’m sorry if the answers they are and I just haven’t seen it. When you give the nutritional information for the soy yoghurt at the end, that’s for what quantity? One cup? What’s the serving size? Thanks, and I hope you’re staying cool through this heat wave.
No problem, the nutrition info at the bottom (201 cal) is for 1 cup of soygurt. It’s actually been mild and rainy where I am for the past week but looks like it’s gonna get hot in a few days here – hope you’ve been staying cool and safe as well!
I’ve been vegan for 10 plus years and have a yogurt maker. I also have a soy milk maker. I’ve tried for years to make my soy yogurt thicken. It’s been like water until I found this recipe. I did 1.5 cups of soybeans to 6 cups of water in my machine after the Myoko soaking method, I made soy milk, I cooled until 120 degrees, then filtered through a nut milk bag. I kept 4 cups in one bowl and then poured remaining in another bowl. I added 1/2 cup of silk plain vanilla almond milk yogurt, the 4 cups of soy milk and 1 cup of cashews back to my milk machine and processed on cold cycle, I poured in my yogurt maker and turned on and checked 12 hours later. It’s perfect- I can’t believe how thick it is!
I added 2 cups of water to the second bowl and made 4 cups of soy milk. This recipe is a keeper. Thank you so much for sharing. I now have my own homemade Greek yogurt.
Thanks for your lovely review Lisa! I’m happy you can enjoy your own homemade vegan yogurt now 🙂
I have been making soy yogurt in my IP for a while now, and I have had great success straining to get a Greek yogurt style consistency. I then use some of the whey to start my next batch but am still playing around with the amount of whey to use.
I tried this recipe this week and am completely thrilled with the flavor. The yogurt, however, was much thinner than my normal consistency. I had difficulty straining the whey because the yogurt just flowed through the cheesecloth. I put the yogurt back in the refrigerator and will try again using a nut milk bag. Since the flavor is so good, I will just eat thinner yogurt this week, but I am curious what you think about the consistency…
Sorry for the late reply- I have never tried straining this yogurt, as it turns out thick enough for me already without straining. It’s not as thick as Greek yogurt but imo it’s comparable to the storebought non-Greek vegan yogurts like Maison Riviera or Silk. It does thicken up once chilled, so hopefully you found the consistency a bit better after a night in the fridge. Let me know!
I can’t make my own soy milk this time I was going to use store-bought however, I don’t see anywhere how much soy milk to use. It seems that you indicate to use double the amount before boiling it but I don’t know how much soy milk to add to the yogurt recipe, I also want to use probiotic capsules as I do not have any vegan yogurt at this time
You can use anywhere from 6 to 8 cups of storebought soy milk (use less for a thicker yogurt, more for a thin yogurt). I recommend using a soy milk with as few ingredients as possible (ideally just soybeans and water). You can disregard the “double-strength” part if using storebought milk; just pour it straight from the carton. Using the capsules, you may have to experiment a few times because different brands of probiotic capsules will vary in strength, but 1 capsule per cup of soy milk should be more than enough. You can always try dialing it back in future batches.
I so appreciate your response. I finally got around to trying with your suggestions having used capsules in different recipe prior, I added three capsules of WF brand capsules because my yogurt was really “too thick” when i used more. It is definitely an experiment! I’ll get back to you on response after incubation period in instant pot is done. Thanks so much!
No problem 🙂 Let me know how it turns out.
It wasn’t very good….didn’t seem to be active. I’m just going to use non dairy yogurt next time. Cashews and soy milk were wasted…I was going to use for something but never did. Best to follow your lead 😉
Oh no, I’m sorry it didn’t turn out. Did it never get sour? I wonder if adding some sugar would help to give the bacteria some extra nutrients to boost their activity. I don’t think I have access to your brand of probiotic capsules, but I’ll do some experimenting with the ones I have.
This looks like a great solution, I love both cashew cream and soy yogurt so I will give it a try sometime.
I also use a 4 to 1 (water to soybean) ratio for making yogurt. What I end up doing is straining the whey from the yogurt with a very large coffee filter for a few of hours and then using an immersion blender to get a really smooth and creamy result that we really like. When I use a store bought soy milk, that usually reduces the volume by half since that milk is not very thick. My homemade soy milk is thicker than the store bought so not as much whey separates out. Your method seems like a great way to get the creaminess and maintaining the volume of yogurt.
I’m curious if you have experimented with the amount of starter yogurt you use. I use 2 Tbsps of starter per quart batch and it seems to do well. I make a batch of yogurt and freeze it in 2 Tbsp cubes so I always have starter available. I also experimented with using the whey left over from straining and it seemed to work just as well. When I started making yogurt I used a 1/4 cup of starter but I don’t see much difference using half of that.
Definitely give the cashews a try. It adds more fat to the yogurt which makes it creamier, and reduces the bean-y taste. (Which, I’m all for the taste of soybeans usually, but pure fermented soy yogurt has a bit too strong of a flavour for me.)
Thanks for the tip about freezing the yogurt starter; I wasn’t sure it would still be effective after being frozen. I have a few jars in the freezer that I was planning to test but I hadn’t gotten around to it yet. The lowest ratio of starter I’ve used is 1/4 cup for 1 batch of this recipe (ie. 1/4 cup yogurt : 6 cups cashew-soy milk). It usually works fine but there were a few times I tested using storebought yogurt starter where the yogurt didn’t quite set enough. Haven’t tried cutting it down to 2 tbsp yet!